The DIY 5.7 Hemi Swap into a 2007–2011 JK — Hotwire Path
A phase-by-phase walkthrough for dropping a used 5.7L Eagle Hemi into a 3.8L JK using a Hotwire Auto plug-and-play harness. Built for a driveway with a lift, not a shop floor. Honest timeframes, the tool list that actually matters, and the mistakes that cost most builders a month.
If you want a V8 in a JK and you want to keep the Mopar-on-Mopar emissions story clean, the 5.7 Hemi + Hotwire harness path is the build to price first. A used 2009–2012 Grand Cherokee or 2009–2010 Commander 5.7L drivetrain, a Hotwire Auto JK-Hemi harness, mounts, fuel and cooling work, and a refreshed 545RFE transmission. Parts come in at $13,500–$18,000 if you source carefully. Add another $5,000–$8,000 if a shop is doing the labor.
It is not a weekend job. Expect 120–160 hours of actual wrench time if this is your first V8 swap, and three to six weeks of calendar time once you account for waiting on the harness, machine work, and the part you forgot to order until it stopped you. If you've never pulled an engine before, do a clutch job or a head gasket first. That work teaches the muscle memory this build needs.
What follows is the full install. It assumes you've already picked your engine path on the JK Engine Swap Decision Tool and you've built your bill of materials with the V8 Swap Parts Checklist. If you haven't done those two steps yet, do them first — this guide assumes the parts decision is already made.
1. What you're actually building
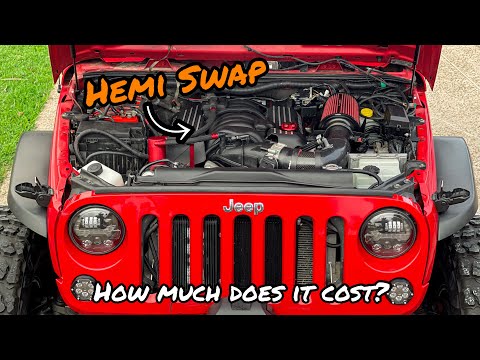
The "Hotwire path" is shorthand for the most common DIY 5.7 Hemi JK swap in the field. The recipe:
- Engine and trans: A used 5.7L Eagle Hemi (2009 and later, "Eagle" heads — the 2003–2008 Hemi has different intake and head castings and is not the version you want). Pull comes from a 2009–2012 Grand Cherokee WK2 or 2009–2010 Commander XH/XK. Pair it with the donor's 545RFE 5-speed auto. Whole drivetrain pullouts run $3,500–$5,500 from Fraser, Powertrain Products, or a local LKQ yard.
- Harness: A Hotwire Auto JK-Hemi conversion harness ($1,500–$2,000, lead time 4–8 weeks). This is the single most important part of the build. It ties the donor Hemi PCM to the Jeep TIPM and CANbus so your dash, A/C, cruise, and gauges keep working. Skipping this means hand-pinning roughly 100 connections and writing your own CAN translator — that is a project, not a step.
- Mounts and adapters: Hemi-to-JK motor mount adapter plates ($300–$600) from AEV (if you can find a kit), Hotwire, or Jeepspeed Performance.
- Transmission output and transfer case: The 545RFE bolts to a JK NV241 or Rubicon NV241OR via an adapter. The factory rear driveshaft length needs to be checked and almost always shortened.
- Cooling, fuel, intake, exhaust: Upgraded radiator (Mishimoto or Ron Davis), Hemi-specific silicone hoses, a 3-piece exhaust set built for the JK Hemi (RubiTrux and AEV both offer one), and a fuel pump upgrade (Walbro 450 or AEM, $250–$500).
- A/C: Hemi compressor mounts in a different location than the 3.8 — the factory JK A/C lines do not reach. AEV's old kit included CNC-bent 3-piece lines; if you can find the kit or a copy, use it. Plan on a refrigerant evac and recharge ($200–$300) at a licensed shop since you'll have the system open.
Power lands at roughly 360 hp and 390 lb-ft at the crank, versus the 3.8's 202 hp and 237 lb-ft. The JK's Dana 30 front and Dana 44 rear are adequate for this power level on 33s. If you're running 35s or larger, plan to re-gear (typically 4.88s) and consider chromoly axleshafts.
Phoenix and CARB-state emissions note
The Mopar-in-Mopar logic is what makes this swap work in Maricopa County and similar regimes. Same OEM (Stellantis), same OBD-II protocol, single diagnostic port. A 2009 Grand Cherokee 5.7L donor is by definition same-or-newer than a 2007–2010 JK chassis, which is what the inspector cares about. Keep every catalytic converter, the full EVAP system, and the gas cap function intact through the install. Owners report passing in AZ and CARB states — but always verify with your local referee before you cut.
2. Prep checklist — before you spend a dollar
Most failed Hemi swaps fail before the wrench comes out. The four things to lock down before any cash leaves your account:
- You have a covered workspace, a way to lift the Jeep, and at least one engine hoist or A-frame. A driveway in Phoenix in July is not a workspace.
- You can leave the Jeep down for at least three weeks. Do not start this with the truck as your daily driver.
- You've read the Hotwire harness install manual front to back. Hotwire emails it as a PDF — ask for it before you order if you want to read it first.
- You have a donor source lined up — a specific yard, a specific Grand Cherokee, a known mileage. Don't start the teardown on the JK before the donor is in your shop.
- You've priced the full bill of materials in the V8 Swap Parts Checklist and the total is something you can afford to finish, not start.
- If you live in a state with referee or visual emissions: you've called the referee station, asked about the swap, and have a contact name.
- Title and insurance — your insurer knows about the swap. Some carriers will quietly drop you mid-build if they find out after the fact.
Honest gut check
If three of the seven items above feel uncertain, do not start yet. You will lose more money walking away from a half-finished swap than you will waiting six months and getting the prep right. Buying a Rubicon 392 used is also a perfectly valid alternative — it isn't failure, it's math.
3. Tool list — what you actually need
The tool list below is the minimum that gets you through the build without the project stalling because you're waiting on something from Amazon. Items marked rent are reasonable to rent for the day.
Lifting and supporting
- Two-post or four-post lift (preferred) — or a 3-ton floor jack and four 6-ton jack stands rated for the weight
- Engine hoist (2-ton minimum), or rented A-frame and chainfall (rent)
- Engine leveler — the chain-driven kind, not the cheap stamped one
- Transmission jack (rent) — the 545RFE is heavy and awkward without one
- Wheel chocks, two pair
Wrenching
- 1/2-inch and 3/8-inch ratchets, full SAE and metric socket sets including deep and shallow
- Long breaker bar (24-inch minimum)
- Impact driver (corded or 18V+ cordless), 1/2-inch drive
- Click-type torque wrenches in 1/4, 3/8, and 1/2 drive — calibrated
- Allen and Torx bit sets including E-Torx (the JK trans crossmember uses E-Torx)
- Pry bar set
Electrical
- Deutsch connector kit (the Hemi engine harness uses Deutsch terminals)
- Quality crimper — ratcheting, not the stamped pliers from the parts store
- Heat gun, shrink tube assortment
- Digital multimeter — auto-ranging
- OBD-II scan tool that reads Chrysler — JScan on a tablet with a Bluetooth dongle is the popular pick
- Test light, 12V, with a long lead
Fluids and shop
- A/C manifold gauges if you'll evac the system yourself — most builders pay the $200–$300 to a licensed shop instead
- Brake-line flaring kit if you'll relocate any lines for the new compressor
- Plasma cutter or angle grinder with cutoff wheels — for the trans tunnel and exhaust trimming
- Welder — MIG, 110V is enough for the brackets you'll be tacking; 220V is better
- Drain pans (three minimum), shop towels, parts trays, ziploc bags and a Sharpie for fasteners by section
The single best tool decision you can make
Buy a label maker. Bag and label every fastener bundle by where it came off. A 90-minute job becomes a six-hour job when you're staring at a coffee can full of bolts trying to remember which intake manifold bolt goes where. Trust the people who learned this the hard way.
4. Phase-by-phase install
The phases below are the order most experienced JK Hemi builders run. They overlap — you'll be ordering Phase 3 parts during Phase 1 — but the wrench order matters.
Donor strip-down and inventory
Pull the engine, trans, transfer case, PCM, gas pedal assembly, and the full engine harness from the donor. If you have the whole donor truck, pull the gauge cluster and key cylinder too — Hotwire may ask for VIN documentation, and the cluster has the mileage you'll want for paperwork. Strip the accessories: alternator, A/C compressor, power steering pump, coil packs. Refresh anything that's questionable while it's out — plugs (16 of them, two per cylinder), coils (8), and the cam phaser if the Hemi has the MDS lifter tick. Failing coils are the most common no-start cause after a swap.
Label every harness lead with masking tape and a Sharpie before you cut anything. Photograph every connection from three angles. Take more pictures than feels reasonable. You will thank yourself in Phase 5.
JK teardown
Disconnect the battery and pull the negative cable away from the post — tape it. Drain the coolant, drain the trans, drain the transfer case. Remove the grille, headlights, hood, radiator and condenser as a pair (keep the condenser hung if you can — refrigerant lines don't need to be cut yet). Pull the front bumper and skid for clearance. Disconnect the front driveshaft, the trans crossmember, the shifter linkage, the trans cooler lines.
Then pull the 3.8 and the 42RLE together as a unit through the top. The factory engine is light enough that one person on the hoist can do it; a second person guiding from the side makes it safer. Set the old drivetrain on a pallet — it has resale value on Marketplace, typically $400–$900 as a running take-out.
Motor mount adapter install + dry-fit
Bolt the Hemi-to-JK adapter plates to the frame. AEV plates, if you have them, are pre-engineered and bolt-in. Aftermarket plates from Hotwire or Jeepspeed Performance may need slight clearancing of the frame for header-to-frame clearance. Test-fit the Hemi on its mounts — no harness, no accessories — and verify:
- The oil pan clears the front diff and the front axle through full droop and full bump
- The exhaust manifolds clear the frame rails
- The intake clears the hood (most 5.7s clear without a body lift; verify by closing the hood gently)
- The trans tunnel needs trimming or massaging — usually yes, plan for 1–3 hours with a cutoff wheel and a hammer
Pull the engine back out once the dry fit is happy. The rest of the build is easier with the engine bay empty.
Trans, transfer case, and driveshaft
Mate the 545RFE to the JK NV241 (or NV241OR if you have a Rubicon) using the correct adapter. Advance Adapters and Novak both sell adapter kits. The 545RFE output spline and the NV241 input spline need to match — verify before you torque anything. Hang the trans + transfer case on the trans jack, raise it into position behind the engine, and start the bellhousing bolts before any weight comes off the jack.
Have the rear driveshaft measured and shortened by a local driveline shop — almost every JK Hemi swap needs a shorter rear shaft. Get the front shaft length verified at the same time. Driveshaft work is $200–$450 and not optional.
Cooling, fuel, intake, exhaust
Cooling first. Install the upgraded radiator (Mishimoto MMRAD-WRA-07HEMI or Ron Davis equivalent). The factory JK radiator will not keep up with the Hemi in 110°F traffic — this is non-negotiable in Phoenix. Hemi-specific silicone hoses are required because the Hemi inlet and outlet are in different positions than the 3.8. Add a remote trans cooler (B&M or Hayden, mounted in front of the condenser) for the 545RFE.
Fuel next. The factory 3.8 returnless pump tops out around 58 psi; the Hemi needs 58 psi continuous at higher flow. The factory pump usually survives on a 5.7 but is borderline. Drop in a Walbro 450 or AEM upgrade ($250–$500) while the tank is accessible. You will not want to drop the tank again later.
Intake. The donor intake bolts on. If the donor came with the active intake manifold runner, leave it — Hotwire's tune accounts for it.
Exhaust. The exhaust is the most fabrication-heavy single step. RubiTrux, AEV, and several smaller fabricators sell JK-Hemi 3-piece systems with mid-pipes that clear the trans crossmember. Cats stay — leave the front and rear cats in place, mount them where the donor mounted them in the chassis. This is the part the emissions inspector visually checks.
Harness, PCM, and TIPM integration
This is the phase that earns the Hotwire harness its keep. Lay the Hotwire harness over the bay before plugging anything. Verify every labeled lead reaches its connection without stretching or pulling. The harness gets routed along the firewall, down both fender wells, into the cab through the existing 3.8 grommet, and back to the donor PCM (which mounts on the firewall using a Hotwire-supplied bracket).
Hotwire's documentation walks every connection. Connect the Hemi engine pigtail. Connect the PCM. Connect the Jeep TIPM through the supplied adapter — this is the CAN bridge that keeps cluster, A/C, cruise, hill descent, and the brake controller talking. Connect the gas pedal (you're using the donor electronic pedal, not the JK pedal; the JK pedal mounts in the same location, the connector is different). Connect the fuel pump signal lead.
Before powering up: re-check every Deutsch terminal you crimped. Pull-test each one. A poor crimp at the engine harness side is the most common cause of intermittent no-start codes after a swap.
A/C, accessories, and tidy-up
The Hemi A/C compressor mounts on the donor's accessory bracket. The factory JK A/C lines do not reach the new compressor location. Either install the AEV CNC-bent 3-piece line set (if you can find one — they show up on Marketplace and Fortec from time to time) or have a local A/C shop fabricate hoses to length. Reuse the JK condenser and evaporator and dash controls. Take the truck to a licensed shop for evacuation and recharge ($200–$300) — refrigerant is regulated and the gauges are worth $400+ to do it right.
Reinstall the radiator, hoses, hood, grille, bumpers, and skid. Run new ground straps — block to frame, frame to body, battery to block. Bad grounds are responsible for most "weird electrical gremlins" people post about online.
First start, tune, and shakedown
Pre-lube the engine: pull the coils, crank the engine over with the ignition fuse pulled until you see oil pressure on the gauge. Reinstall the coils, prime the fuel system (key on, key off, three cycles), and start the truck. It should fire and idle. If it cranks but doesn't start, the most likely causes are: crank position sensor unplugged, a bad ground, or a fuel pump signal not reaching the pump.
Idle the truck for 10 minutes while you watch coolant temp, oil pressure, and for leaks. Shut down. Re-torque the bellhousing bolts, every exhaust clamp, every fluid drain plug. Re-check coolant and trans fluid levels — both will drop slightly after the first heat cycle. Drive it around the block. Then a 5-mile loop. Then a 50-mile loop. Watch every gauge.
Get the PCM tune verified with JScan or a dealer-level tool. Hotwire ships harnesses with a starting tune, but a Phoenix-specific tune (altitude, fuel grade, the 545RFE shift firmness) is worth $300–$500 at a local Mopar tuner once the truck is running clean.
5. Timeframes by skill level
Real-world hours from JK Hemi builders, not marketing copy. The "calendar time" column accounts for waiting on parts, shop driveshaft work, and the days you'll inevitably skip because life got in the way.
| Skill level | Wrench hours | Calendar time | What it assumes |
|---|---|---|---|
| Beginner | 160–240 hours | 3–6 months | You've done brakes and a clutch but never pulled an engine. You'll learn a lot and you'll redo two or three things. Budget for the redo time. Have a friend who's done one nearby. |
| Intermediate | 120–160 hours | 6–10 weeks | You've pulled an engine before. You can read a wiring diagram. You own most of the tools above and can rent the rest. This is the experience level most JK Hemi DIYers actually sit at. |
| Experienced | 80–110 hours | 3–5 weeks | You've done a swap before. You've crimped Deutsch terminals before. You have a lift and a transmission jack on hand. Even at this level, the harness phase is 16+ hours — Hotwire's plug-and-play is not magic. |
| Shop install | 60–90 shop hours | 4–8 weeks | At $130–$180/hr shop labor, that's $8,000–$16,000 added to the parts bill. Most JK Hemi shops quote $32,000–$42,000 turnkey including parts. RubiTrux is the canonical example. |
6. Common mistakes — the ones that hurt
Ordering the Hotwire harness last
Lead time is 4–8 weeks. Order it the same week you order the donor pull-out. The harness is the long pole; nothing else holds up the build the same way.
Buying a 2003–2008 5.7 Hemi instead of a 2009+ Eagle
The pre-Eagle Hemi has different intake and head castings and a different cam profile. Hotwire's harness and tune are built for the Eagle. Donors from 2009 and newer Grand Cherokees, Commanders, Durangos, and Ram trucks are the correct generation.
Reusing the factory JK radiator
It will not keep up with the Hemi in summer heat. Plan on the Mishimoto or Ron Davis upgrade as part of the build, not as a fix you do later when it overheats on the I-10.
Skipping the fuel pump upgrade
The factory pump survives a 5.7 in best-case conditions. The first time you tow on a hot day or sit at high throttle on a long climb, you'll find out where the ceiling is. Walbro 450 while the tank is out — once, properly.
Bad grounds, every time
Every weird electrical issue people post about after a swap traces back to one of three grounds: block-to-frame, frame-to-body, or battery-to-block. Run new copper, clean to bare metal, no paint under the eyelet. This costs $30 in cable and prevents most of the headaches.
Cutting the harness too soon
Hotwire ships with extra length in most leads. Do not trim until the harness is in place, the PCM is mounted, and the engine is in its final position. Once you cut, you cannot uncut.
Forgetting the rear driveshaft
The 545RFE plus the transfer case adapter shifts the output. Almost every JK Hemi swap needs a shortened rear shaft. Get it measured during Phase 3 and to the driveline shop while you're working on Phase 4 — don't make it your last step before first start.
Treating "plug and play" as a turn-key promise
The Hotwire harness is plug and play in the sense that the connectors mate and the CAN bridge works. It is not plug and play in the sense that you'll be done in a weekend. Read the manual, label everything, follow Hotwire's sequence. The harness shortens the wiring phase from a month to a week — it does not turn a hard build into a soft one.
7. First-start checklist
Walk this list in order before you turn the key. Every item is here because someone — often several someones — has skipped it and paid for it.
- All bellhousing bolts torqued to spec (Hemi-to-545RFE: 30 ft-lb, per Mopar service manual)
- Engine oil filled to spec — Hemi takes 7 quarts with filter, 5W-20 unless your tune calls for 5W-30
- Transmission fluid filled — 545RFE takes ~14 quarts; ATF+4 only
- Coolant filled and bled — Hemi has a bleeder on the thermostat housing; open it until coolant streams without bubbles
- Transfer case filled — NV241 takes 1.6 quarts of ATF+4
- Front and rear axle fluid checked — usually undisturbed but verify
- Power steering reservoir filled, system bled by turning lock-to-lock with the front wheels off the ground
- Fuel lines pressurized — key on, listen for the pump, key off, repeat three cycles before cranking
- Every Deutsch terminal pull-tested
- All three ground straps installed and torqued
- Engine pre-lubed — coils out, crank until oil pressure shows on the gauge
- Battery fully charged, not merely connected — a marginal battery will throw codes that look like a wiring fault
- Fire extinguisher within reach
- OBD-II scanner connected and reading live data before the first crank
- Someone else in the garage with you
First-start safety
An engine on a fresh swap can leak fuel, leak oil, or in rare cases bend a valve if the timing was off when you assembled it. Have a fire extinguisher at arm's reach (10 lb ABC, dry chemical). Don't lean over the engine on the first crank — stand to the side. If you smell fuel before the engine catches, shut down and re-check the rail and injector seals before you try again.
8. Related tools and reads
More install guides coming: JK NAG1 transmission swap, JK LS path, TJ 4.0 refresh, and XJ stroker build. If you've completed a Hemi swap and want to send corrections or photos, email Daniel.